get 500+ free images, templates & marketing strategies! You're one click away, Don't Miss It.

Included Free:
550+ Templates, Photos, & Strategies
Get New Free Downloads Monthly
Unlimited Downloads
Special offers & Trends Newsletter
Save and sort your favorites
Access 500+ Free Templates, Photos, & Strategies With A Free Account
Free User Creation for Popup
By creating an account, I agree to Ivory Mix's Website terms, Privacy Policy and Licensing Terms
Already have an account? Log in
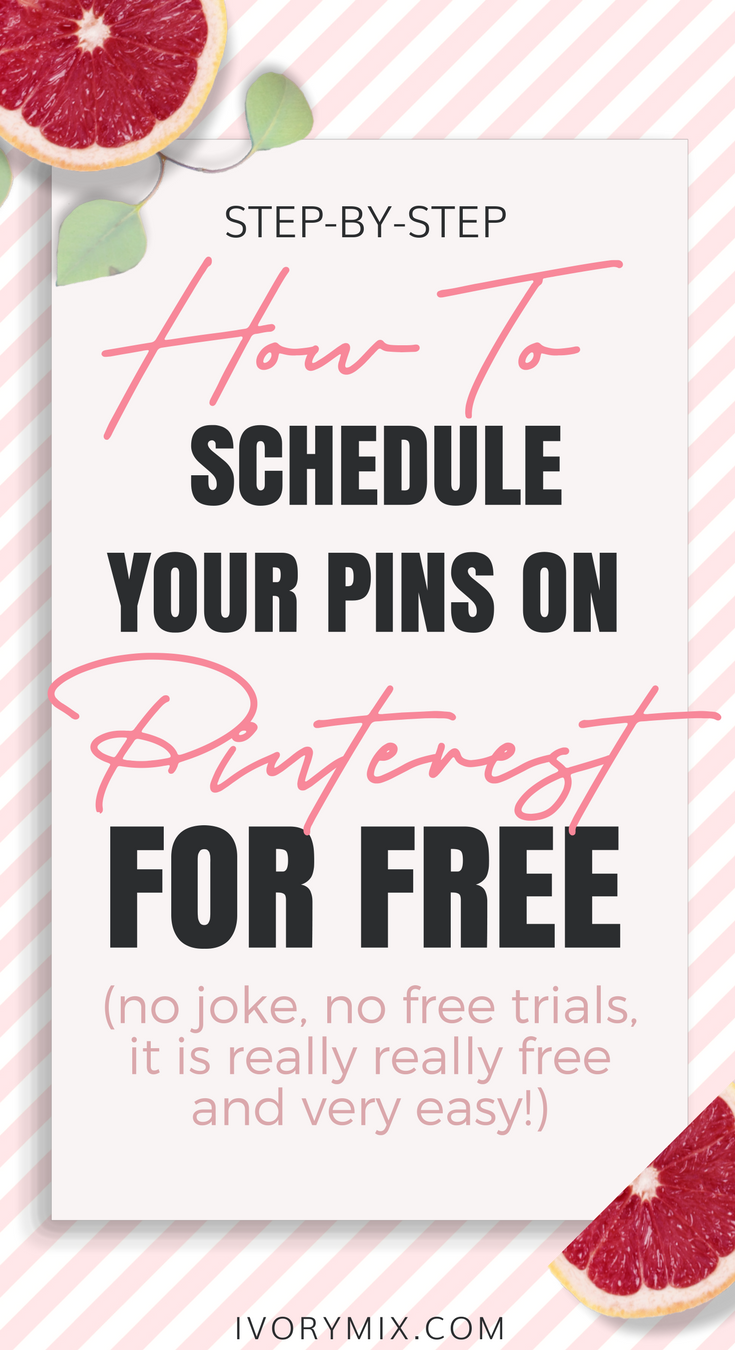
How to schedule your pins on Pinterest for FREE
This post may contain affiliate links. Please read the disclaimer

When we talk about Pinterest Marketing, it’s inevitable that some form of scheduling or automation comes into the conversation. Pinning manually seems like a great idea to save a few bucks for a while until you realize that your audience is really active at midnight on Saturdays.
I don’t know about you, but I’m not staying up past 9 most days… and I’m definitely not staying up to manually pin anything on Pinterest.
That’s where automation and scheduling can come in handy. It takes Pinterest marketing your online business to a new level, but it’s not free. Or is it?!
In the past, I’ve outlined exactly how I use both BoardBooster and Tailwind to automate and schedule my Pinterest strategy. You can read one of those blog posts here.
You could go ahead and do the free trials that both BoardBooster and Tailwind give you, using the affiliate referral links indicated with an asterisk*
Click here to try *Boardboooster forfree(as of June 2018, Boardbooster is no longer available)- Click here to try *Tailwind for free*
But, if you’re wanting to try a different way of scheduling and automating for free, then read on.
What you need to automate your Pin schedule for FREE
1. a free Google account (you’ll be using the google calendar)
2. a free account on IFTTT
3. a Pinterest account
Learn how to schedule your Pins on Pinterest for Free with this full video tutorial:
Step 1. Set up a NEW CALENDAR on your Google account (Name it to match one of your Pinterest boards)
Thankfully, Google accounts are free and come with Google calendars. So, if you don’t have one yet, go ahead and click here to sign up for one now.
Once you have your free Google account set up, head to Google Calendars and add a new calendar.
This calendar will act as the source and schedule of your pins that you want to share with a specific board, so name this calendar something similar to the board you’re going to schedule pins to.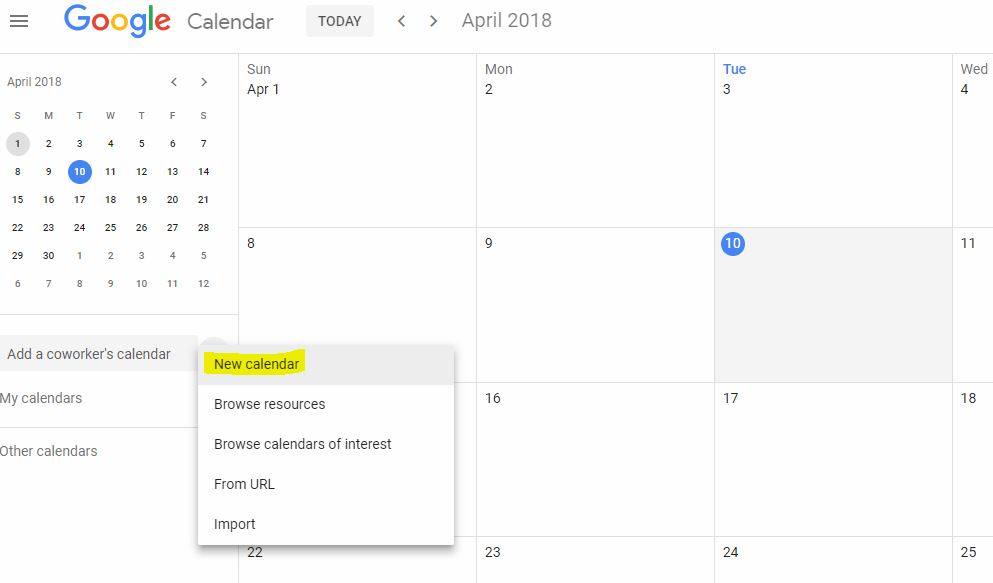
Step 2. Add an event to your calendar (a single event or a repeat event)
When you add an event on your new google calendar, you’ll want to grab the link of the URL you want shared on Pinterest and fill in the date and time you want the pin to be shared. You can schedule it once or on a repeat schedule.
Don’t forget to add a description too and use any hashtags, etc.

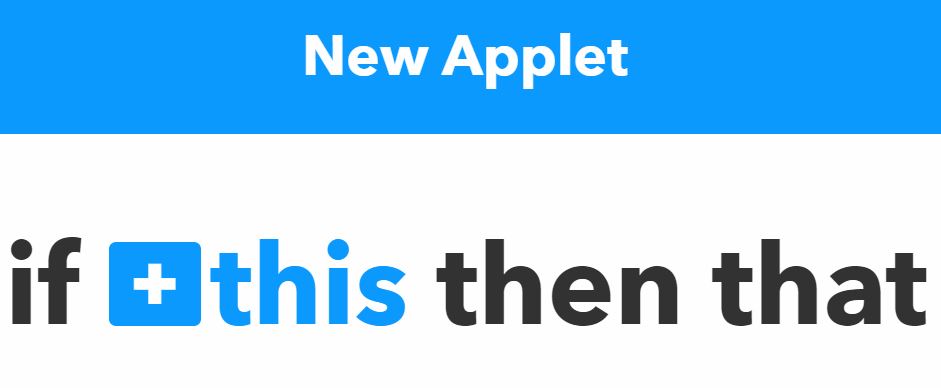
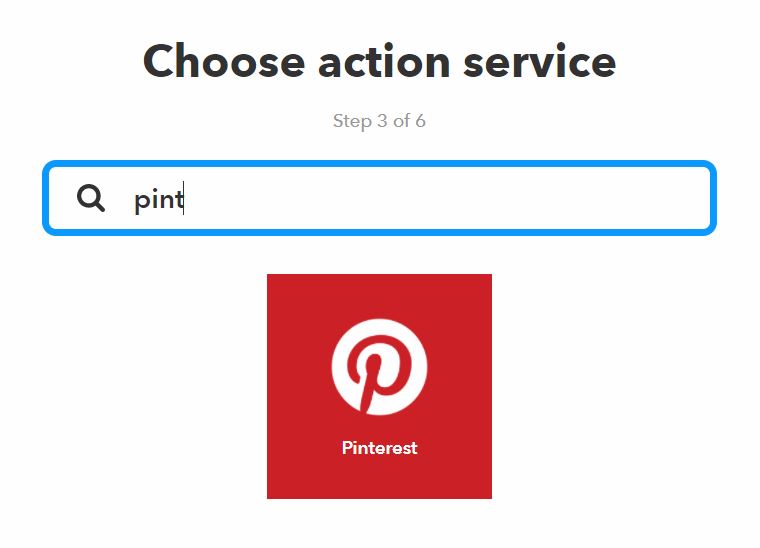
Step 3. Sign up for an IFTTT account and add a new applet on IFTTT
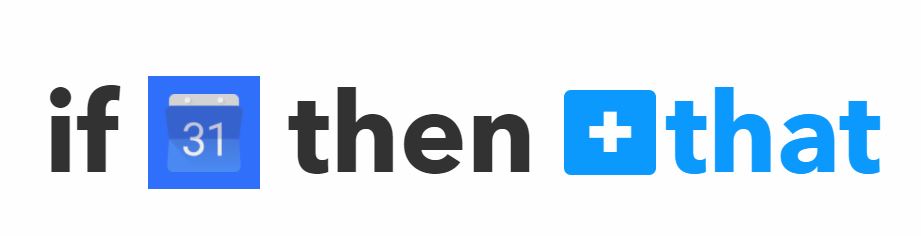
The tool you’ll be using to link your Google calendar to your Pinterest account is called “If this then that” or IFTTT.COM
IFTTT.COM connects various devices and services together using simple “If this then that” statements and logic. So, for this automation to work, we’re going to set up a statement that says “If any event starts on your google calendar, then add Pin that event to this board”.
Seems pretty simple, right? Let’s walk you through how to do it.
Click here to join IFTTT.COM. Once you make your free profile, click on “My Applets” and “New Applet” to start the process of connecting Google to Pinterest.
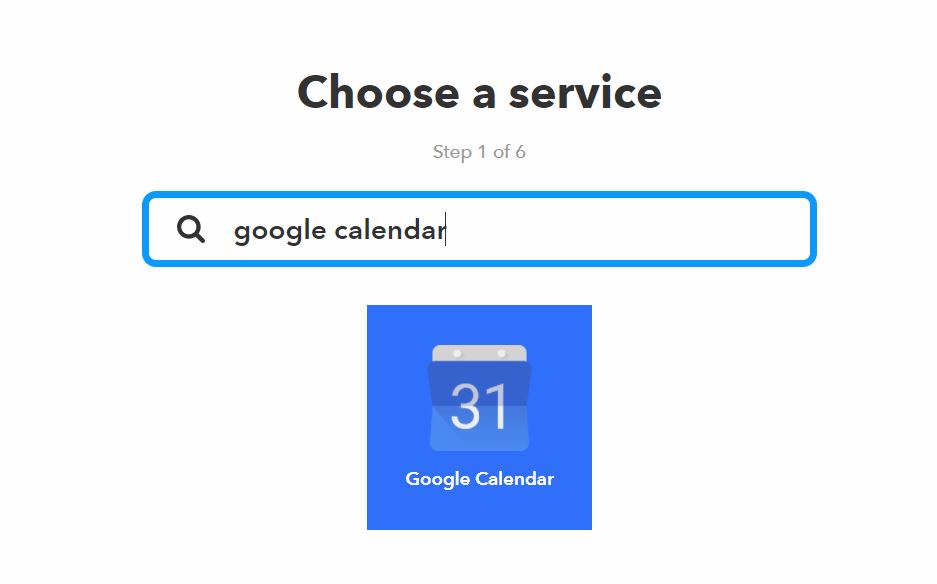
Step 4. Choose ‘Google Calendar’ as your first service connection
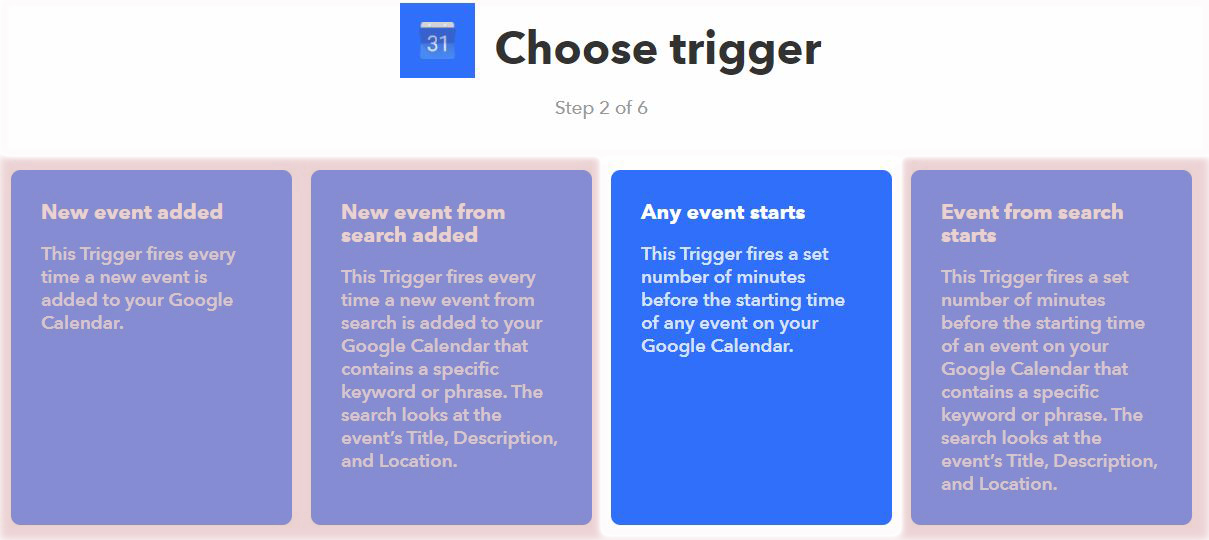
Step 5. Choose the ‘Add event starts’ as your first trigger
This trigger is called “Add event starts” and will turn on the automation of sharing your pin to Pinterest when that event on your Google calendar starts.
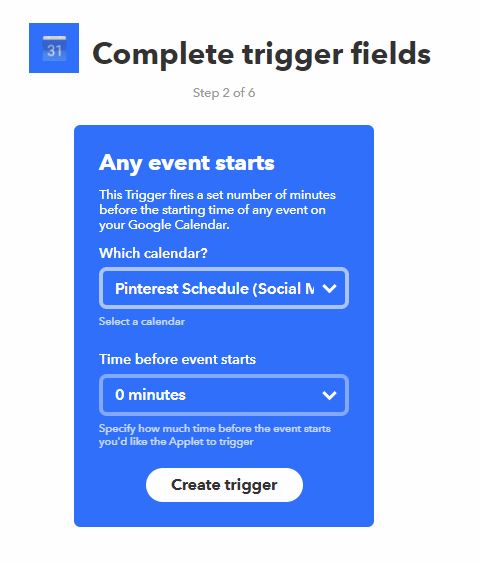
Step 6. Choose the ‘Google Calendar’ you wish to connect this applet to and click “create trigger”
Remember that Google calendar we created? This is where you add it to your IFTTT applet. You can choose when to have this triggered by selecting how many minutes before the event goes off. But, keeping in at zero minutes will make the trigger go off when the event happens. It’s okay to keep it at zero minutes.
Now that the “THIS” portion of your IFTTt statement is complete, the next step is to choose the service and steps to connect to the “THAT” portion of this statement, which involves Pinterest.
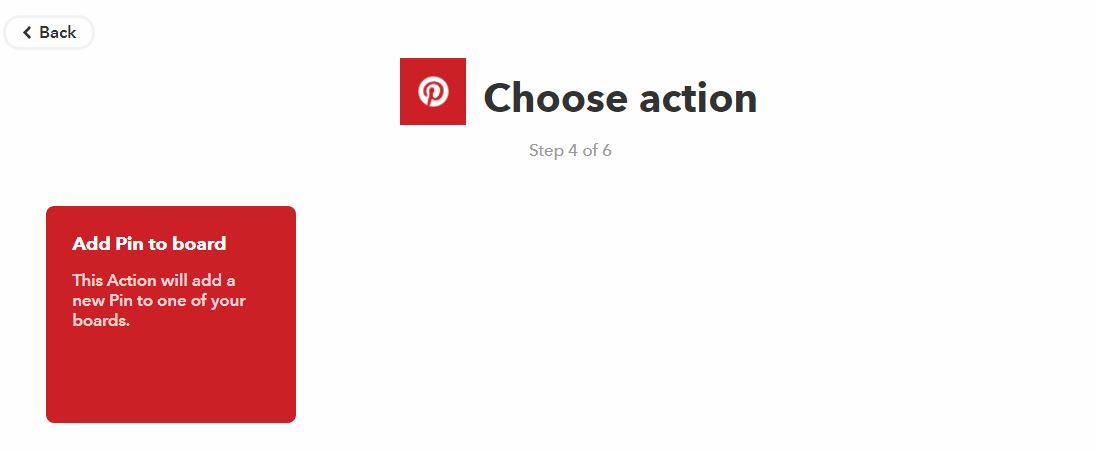
Step 7 – Choose ‘Pinterest’ as your second service connection
Step 8. Choose ‘Add to Pin Board’ as your trigger
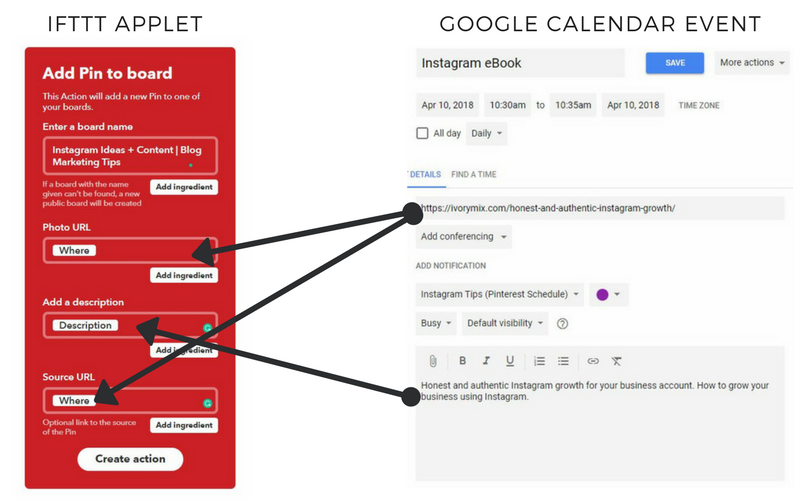
Step 9. Fill in the details of the action you want IFTTT to take (see the screenshot here for example)
This part is a bit tricky, so pay attention! You must enter your Pinterest Board name as it appears on your Pinterest account, exactly. Which means, if you ever rename the board, this applet will break.
Using the IFTTT ingredients, be sure to fill in the Photo URL and the Source URL as {{WHERE}}. This will tell IFTTT to grab the location URL that is on your Google calendar event. Also, be sure to add {{Description}} to the “Add a description” portion of this.
These steps ensure the pin will be linked to the proper URL you want your audience to be taken to when they click on your Pinterest Pin.
As for the photo that gets shared, there is a chance that this automation may grab a random photo from the URL you are sharing. The fix for that is to add a direct URL link to the image you want to use in one of the other ingredient area’s. For example, you could add the URL to the pin image as the “Title” of your Google calendar event/
Step 10. Review your applet and click “Finish”
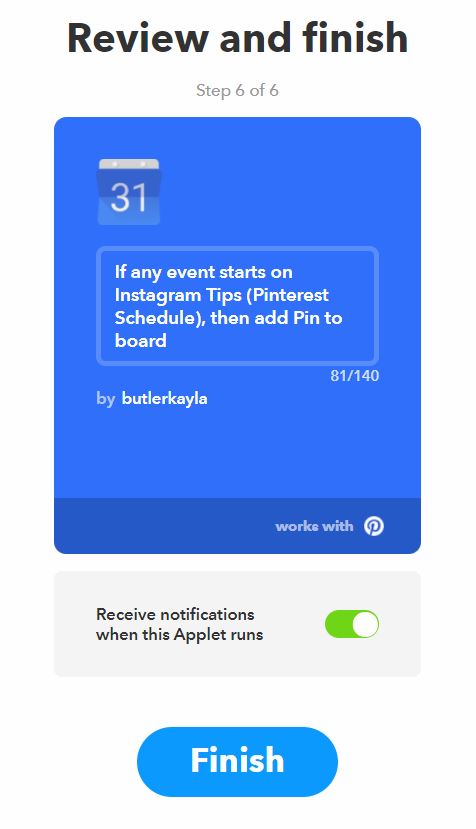 What happens next is the genius part!
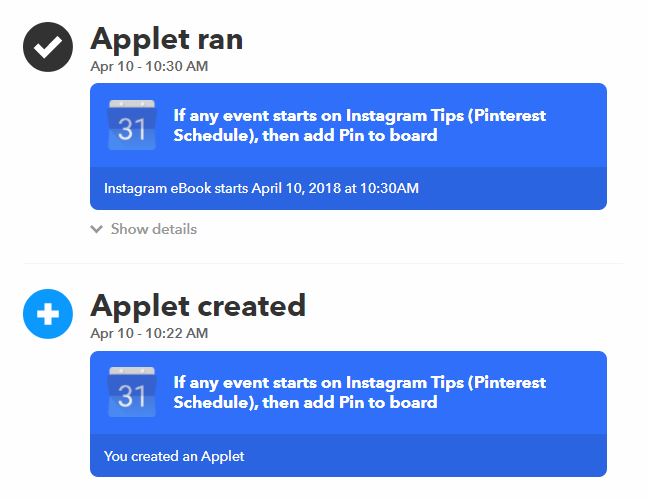
Your new scheduled pin on your Google calendar will automatically be added to your board on the day and time you scheduled it too.
To see if everything is working correctly, you can even check your IFTTT account activity feed. It will show you when an applet is created, running, or if there are any failures.
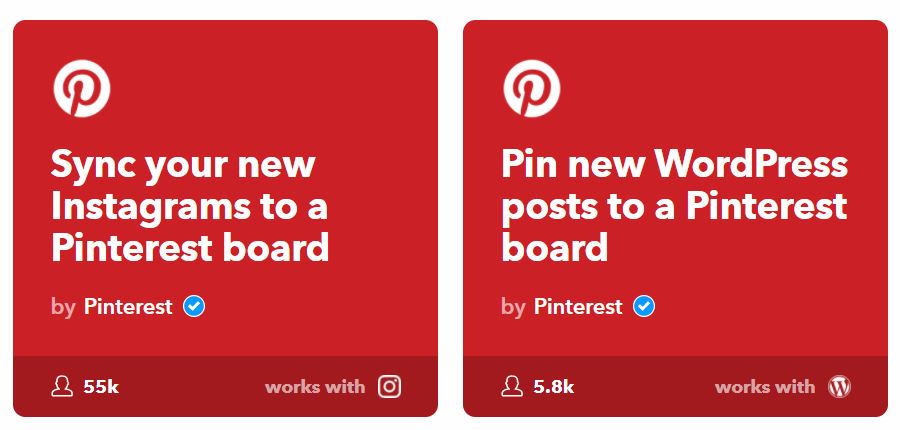
Step 11. Don’t stop there. IFTTT has multiple automation applets for Pinterest.
From automating the pins from one board to another board to syncing your Instagram posts to pin on your Pinterest account, the possibilities with IFTTT automations seem endless.
Want more tips? Click here to grab a free copy of this complete guide to Pinterest Marketing.
LOOKING FOR MORE PINTEREST TIPS? HERE ARE SOME OF OUR BEST BLOG POSTS:
Included Free:
550+ Templates, Photos, & Strategies
Get New Free Downloads Monthly
Unlimited Downloads
Special offers & Trends Newsletter
Save and sort your favorites
Access 500+ Free Templates, Photos, & Strategies With A Free Account
Free User Creation for Popup
By creating an account, I agree to Ivory Mix's Website terms, Privacy Policy and Licensing Terms
Already have an account? Log in
18 Comments
Leave a Comment
You must be logged in to post a comment.


Very cool! Love tutorials like this, especially for bloggers that are just starting out.
Thanks Corina! I love making tutorials that I would have enjoyed when I started out.
Genius! I can’t wait to have a few moments to try it out ?
Thanks, Brandi! Hope it works well for you.
Brilliant! I can’t wait to give it a try! I’ve heard of IFTTT before but had no idea how to use it! Great tutorial!
This is AWESOME! I’ve never heard of IFTTT! it looks like there are so many opportunities to use it to automate. Thank you for the detailed video – I just implemented this for my Pinterest Account!
Yay! So glad you were able to implement this. glad to help and Happy Pinning <3
I just walked through this tutorial and created my first 3 applets! Can’t wait to start using this tool! Thank you so much!!
Glad to help, Lacy!!
It’s working great so far! However, I copy/pasted the vertical image URL as the event title, but it’s still pulling the smaller, horizontal feature photo. Any ideas?
Try starting over with the applet. Maybe try and reversing it too if that doesn’t work. As in, put the content Url in event and image url in the where. It should work
OHMYYY this is timely as I’ve been looking for a way to automate Pinterest but I can’t spend yet since I’m not earning from my blog yet.
Glad to help and get you started and growing !
This is fantastic! I love using IFTTT. Plus pinning to Pinterest at later times has really increased my traffic. I do have one question- do you make a new applet for each pin you schedule or just one applet per day? Thank You
You can make one applet per board and then schedule your multiple pins on your calendar. Does that make sense? I think if you made an applet per pin.. you would have many many calendars on Google.
Thanks for this! I’ve been using IFTTT for a few years now and adore it. But, I haven’t used it for pinning yet–other than to send my new posts to pinterest.
I had no idea that this could be done! Thanks for sharing this awesome trick! The video tutorial is a huge help.
Love that it’s free too ?
Just wanted to say thanks so much for sharing this information. I’ll definitely start using IFTTT to automate some of my Pins from now on.
You’re awesome 🙂